Sunday, November 28, 2010

Tis The Season To Sparkle

I LOVE Christmas!  It's my favorite time of the year!  Christmas carols, cold weather, twinkle lights, glitter, garland, oh it's all wonderful!

I like to enjoy my Christmas as long as possible, so I decorate the weekend after Thanksgiving, and this year was definitely no exception.

And I wanted to share my holiday world with you!  And just so you know ahead of time, for every "crafty" thing I show you, I'll post a tutorial over the next few days including a few recipes and LOTS of hot glue :)

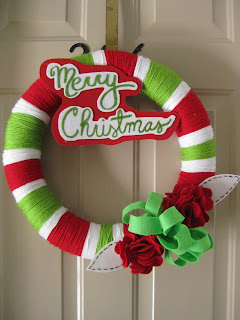
Christmas isn't Christmas without a cute wreath... I got the idea from The Eclectic Owl & her adorable Alabama wreath.


Close-up.  Love it!

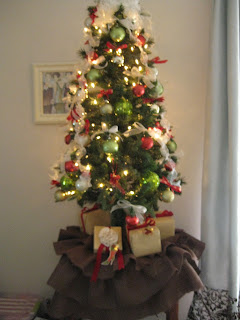
My bare lil' Christmas tree.  To explain, yes, I own a HUGE 7 foot pre-lit artificial tree.  Yes, I have the space to store it as well as the space to put it up.  No, I didn't put it up this year.  Why?  Well, mostly cause I'm lazy and didn't wanna haul the whole thing out, decorate it, and then have to un-decorate it and put it away.  And partly cause I'm lazy and didn't wanna have to haul the whole thing out, etc....

So instead I have this lil' baby adorable tree ($29 at Hobby Lobby, folks!).  It wasn't pre-lit, so I went ahead and strung up a Dollar Store strand of lights.  How do you do your lights?  I zig-zagged back and forth and missed the back of the tree.  Growing up, we wrapped all the way around.  Again, I'm lazy.  I do things my way.

My colors are gold, cream, and crimson...

But this just looked a smidge boring & so I pulled out some of my lime green ornaments from my "bright" colored days....
And we ended up with this!  Now, I've still got some major tweaking to do (which will include adding some burlap birdie ornaments!!!), but I have to say, I absolutely love artificial Christmas trees because I get to position the branches where I want them.  No offense to God & His Divine wisdom, but it's durn near impossible to make a real tree bend where you want it.  Plus, they make me sneeze.

I pretty much hate that bow at the top.  The ribbon is adorable, but it didn't make a very good bow.  I'm thinking about ordering this...

Burlap ribbon from Ballard Designs.  Hi, my name is Ashleigh, and I'm a burlap addict.  (P.s. Thanks, April, for showing this to me!)

Wouldn't that make a beautiful bow?

And of course, there's the GORGEOUS tree skirt that Sister made for me.
Yeah, it's a little big for this tiny tree (and tiny table), but it's still cute & will be perfectly perfect for years to come!

Let's get one thing straight, I hate ornament hangers.  They're just not pretty.  So I was inspired by our baby's first ornaments at work, and this year, I hung all of my ornaments with ribbon...
Like this!  Shimmery, glittery gold for red (and green!) ornaments, and a pretty red grosgrain for gold ornaments. 

And if you look at that picture of my tree + skirt, you can see some presents hanging out under there (!!!!).  I'm a simple Christmas paper kinda gal, so I used basic craft paper from Hobby Lobby ($3.99 for the BIG roll & it was half off!) with some red velvet ribbon (the kind most people use for bows) and this is what I came up with...
Sweet and simple Christmas gifts (after I took this picture, I added ribbon down the side of the package you see here... made it look precious!).  I'll tell you how to make this bow later (it involves hot glue...) and I'll even show you my fool-proof way of wrapping boxes (trust me on this one, I wrap more gifts on a daily basis than you wrap for Christmas!)...

One last thing to show you and then I'll end this longest post ever...

I live in an apartment (I'm sure we've talked about this before) and so I don't have a mantle.  I'm making do this year (like every other year) with my hall tree...
It feels very Pottery Barn-esque, doesn't it? (Apart from the yoga mat/ work mess on the right... sorry, it'll be gone tomorrow when I head back to work!)  And don't you LOVE that window pane up there at the top?  Thanks, Sister, for hanging it.  And thanks, again, to April for going to the Antique Store with me to find it!

The Christmas trees at the top used to light up different colors, but now that they no longer work, I'm considering spray painting them a creamy white & bedazzling them in cream glitter.  What can I say, I love some sparkle! 

And there you have it.  My Christmas decorating is done.  Well, I lied.  Of course, I have some other pretty things to add around the apartment (coffee table, bar in kitchen, dining table, etc.), but these are my big ones!

How are you decorating this year?  Anything new or all the same traditions you've always had?  Share & link to your pictures so I can get some good ideas!

Thursday, November 25, 2010

This Lil' Birdie has a Blogging Sister

My beautiful sister...

(Sister is on the left; that's me on the right)

started a beautiful blog...


You should go visit!  I promise you'll love every single post (all one of them!).

Happy Thanksgiving, all! 


Wednesday, November 24, 2010

What This Lil' Birdie Wore: A Week with No pictures

Umm... so I have no pictures for you this week.  Why? you might ask.  Well, I can't find my camera.  I'm starting to think I might have thrown it away, it's so very lost.

If I find it, I'll post my pictures.  Otherwise, use your imagination :)

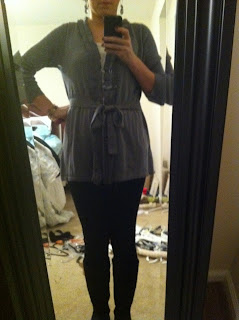
Pretend I look like this & dress this cute (on a normal basis)....


I like people with good imaginations :)

Thursday, November 18, 2010

What This Lil' Birdie Wore: The Late Edition

Okay... so I'm a good day behind on my What I Wore Wednesday.... so this is What I Wore Thursday... sorry!

Linking up with the Pleated Poppy for this one...

Here was last Thursday.  My first day back after being sick, so let's just say this outfit is a little lacking...

Again with the hair back.  Can you tell that I hate this awkward growing out length?
Tank: Old Navy
Cardigan: Target
Belt: J. Crew
Jeans: Banana Republic
Shoes: Seychelles at DSW

Friday... 
Wore this to dinner with B.  On the phone trying to figure out where we were going.  
Cardigan: Target
Tank: New York & co
Jean leggings: Old Navy
Brown booties: Private Gallery

Saturday... ended up working even though I wasn't on the schedule.

So I decided to take my WIWW picture at work!  LOVE this piece of furniture by the way.  Someday I'll show you around my work... for now, back to the clothes...
Sweater: The Limited
Jeans: J & Company
Boots: Skechers from Victoria's Secret
Cute flower pin you can't see:  I'll post a tutorial soon :)

Sunday... no picture... Sorry!  Rushed rushed to get to church on time, and then changed into comfy clothes right after...

Monday...
Another picture at work :)  Apparently I wasn't feeling very creative this day...

T-shirt: Ann Taylor Loft
Scarf: Gorgeous cashmere from Apparel Market when I was buying "baby stuff"
Jeans: J & Company (again)
Boots: Skechers from VS (again)

Note to self: wear jeans LESS!

Tuesday... no picture...

Wednesday...
On the phone with Mommy before heading to work to interview new girls!
Cardigan: Target
Belt: New York & Co
Flower on Belt: Made by me :)  Lots of tutorials to post!
Pants: New York & Co (need to be hemmed 'cause I'm SHORT!)
Shoes: Seychelles from DSW (my go-to work shoes)

And that's that!  What I Wore Wednesday Week 2! 

Aren't y'all glad I finally cleaned up my hangers so the floor is less cluttered?? Me too!  

Sunday, November 14, 2010

This Lil' Birdie is Crafty: Kitchen Artwork

I think kitchens need a little artwork too.  But I'm not a big fan of rooster prints or anything like that, but I did figure out a really cute kitchen art idea not too long ago.

My grandmother passed away last year (God bless her sweet sweet soul) and my sister and I split her many many sets of beautiful silver.  Some sets were fully matched, and then there were some random stragglers like these...


These guys were just destined to become kitchen artwork (they told me themselves)... and here's how I did it!

To start with, these were in some serious need of a good cleaning.  Since I didn't have silver polish handy, I used the next best thing...


Yep, that's right.  I washed my grandmother's silver with Comet.  And it worked wonderfully!

A little water, a little Comet, and look how pretty!


All cleaned and purdy.  Yes, there's a new one in this picture from the last.  One was in the Comet cleaning bowl when I took the first picture.

So I bought some shadow box frames from Hobby Lobby for half off not too long ago, and some scrapbook paper, and I covered the inside backing of the frames with this paper...

And it makes the perfect background for silverware artwork!


All I did was take a tiny bead of hot glue to the back of each piece and stuck it on the backing.  Do I recommend everyone hot glue their grandmother's silver to the back of a shadowbox frame?  No, not really.  Did it work for me?  Yes!

Then I just popped the backs back into their frames, used my favorite Halcyon Green to accent the frames, and voila!


Finished product!


I decided to hang these on the only real wall in my kitchen, and it just adds a cute little touch that was definitely missing before!

Saturday, November 13, 2010

This Lil' Birdie is a Firework

I refuse to spend the rest of my life afraid of being consumed by the light hiding deep inside of me.  Flames don't destroy matter; flames change matter.  A flame does not destroy a piece of paper; it simply changes that paper into ash -- which makes it equally as useful as it was as paper.  So if my entire life is consumed by the fire inside of me, so be it. In the end, I will be changed into something wonderful.

So here's to being a firework.  Go light up the sky.  And MAKE THINGS HAPPEN.

"You just gotta ignite the light / and let it shine / Just own the night / like the Fourth of July" -- Katy Perry "Firework"


P.s. Jennifer, this one's for you!

Wednesday, November 10, 2010

What This Lil' Birdie Wore

So after weeks and weeks and weeks of looking at everyone else's What I Wore posts (my faves?  Emily from Jones Design Company and Kelley Blake from The Eclectic Owl), I decided it was more than time for me to join the linky party!

So here we go.  This Lil' Birdie's What I Wore Wednesday Week #1 (Forgive the crappy pictures; I don't have a fancy camera!)

I think this was Monday of last week...

(Umm, okay, sorry for the mess on the floor! and for the seriously creepy face. I hate self-portraits)
Shirt: French Connection from Belk (I think?)
Skirt: J. Crew
Necklace: Ann Taylor Loft
Tights: Target (I cut the feet off cause they itched)

Last Tuesday...

(Wow... again with the mess.... I'll fix this, promise!)
Undershirt: Ann Taylor Loft
Cardigan: Banana Republic Outlet
Jeans: J & Company
Scarf: The Limited
Bracelet (if you can even see it): from my Grandmother's jewelry box
Ring: found it for $2 at apparel market in Atlanta when we were shopping for "baby things" for the store!

No pictures from Wednesday -- it was my day off!!

Last Thursday...

(Okay, so I moved the mirror and now you can see my pile o' hangers. Gotta fix this NOW!)
Undershirt:  Pretty Ruffled Tank from Banana Republic Outlet
Sweater: The Limited (someday I'll tell you the story of how this sweater came into my possession...)
Black Jean Leggings: 
1. I refuse to call them "jeggings" (I cringe at that word)
2. Old Navy has the best jean leggings ever.  So comfortable!  
Black boots: your guess is as good as mine.  Probably eBay?
Earrings: The Limited

Monday

(Maybe if I actually took the time to blow dry my hair I wouldn't have to wear it up so much... ugh...)
Jacket: Ann Taylor Loft (on super mega sale for $4!  Who cares if it's a size too big?!)
Shirt: French Connection from Belk
Jeans: Adriano Goldschmied (AG jeans) from Sister
Shoes:  Umm... Can't read the brand, but I bought them at Dillards years ago!
Flower pin:  I made it!  Find the tutorial here

Tuesday I was sick and I'm not mean enough to post a picture of the horribleness I was while sleeping on the couch.  So yeah.  And I'm sick again today, and wearing the same thing as yesterday, so once again, no pictures.

And there's that.  My first What I Wore Wednesday week.  It excites me to say I only wore jeans 2 times this week (even though I didn't count weekends or jean leggings).  YAY!  Let's see if I can make this next week better!

Linking up with The Pleated Poppy :)


Tuesday, November 9, 2010

This Lil' Birdie Is Sick

As an ode to the infection that is currently ravaging my respiratory system, I present you the ## things that go right out the window when I get sick. *ah heh hem*

1. Feeding puppy / taking puppy out / picking up when puppy makes messes (like the construction paper "snow" that's currently littering my living room floor, not the "ick, that should've happened outside messes"
2. Putting my shoes away.  Right by the door seems like a great home for them right now.
3. Laundry (see #4)
4. Any sense of style (enter sweat pants + XXL t-shirt from March of Dimes walk)
5. Making dinner (seriously -- would you want a sickly soul touching your food?  I didn't think so)
6. Crafty instincts.  You really do NOT want to see the last thing I "made" when I was sick.  It was hideous and immediately was torn apart to be made into something else and is currently in my fabric scraps box.
7. Sleeping in the bed
8. Dishes (yay! an excuse to not have to do them!)
9. Proper punctuation
10. My budget -- hey, what else am I supposed to do when I'm sick?  I watch TV, get inspired to buy, and shop online!
11. Answering the phone.  Most of the time it's on the other side of the couch or I'm just too lazy to find it.  Email me.  Obviously I'm on the computer anyways (see #10)
12. My diet for the next 3 weeks.  I find too many yummy recipes in all my time online.
13. Rules about puppy being on the couch.  I just wanna cuddle.
14. Lists.  Which is why I'm stopping this one now.

Here's to hoping I feel better tomorrow!

Monday, November 1, 2010

This Lil' Birdie is Crafty: Pretty Flowers Tutorial

I have a confession :  I love flowers.  It's a problem.  Thing is, though, I don't particularly like real flowers.  Except these...

These are alstroemerias.  They are my favorite flowers.  But they die.  And I don't like that.


So I decided to dedicate my love of flowers to things I can wear.  I might be a *tad* too old to wear this...


But I will never ever ever be too old for these...

Look how sweet and romantic and pretty!  I am currently obsessing over all things flower pin related.  But let's face it, I'm boutique on a budget around here, and I can't justify $10+ per flower, and I know me.  I would never be content with just one color or style.

So me being the crafty little birdie I am, I decided to make a few different styles and colors myself!  And I decided to share my how-to with you!

What you'll need:
- Lightweight fabric (I used a pretty polyester lining fabric)
- Hot glue, well at least, I used hot glue.  You can use some other sort of glue, but then where's the fun in the searing pain when you accidentally glue your fingers together?!
- a lighter (trust me on this one!)
- a pen or marker (I used a fancy disappearing ink pen, if not you've got to be a lot more careful about how you cut your fabric... you'll see)
- small round piece of felt for the back of the flower
- some sort of pin or clippie for the back of the flower (I used these...)
- decorative beads or even an old button!

So here's what you do...

Start by tracing four different size circles onto your fabric (I used measuring cups - 1/2 cup, 1/3 cup, & 1/4 cup & free-handed the smallest one).  I was making three different flowers, so that's why I have about a billion circles here.  You'll only need 4 circles in different sizes.

See the lines on the outside of my circles?  That's my disappearing ink pen.  So if you don't use one or if you use a marker, you'll have to carefully cut on the inside of the lines so they won't show.  I'm a lazy lazy birdie, so I use disappearing ink so I don't have to be careful.

Now to get your edges all curly and pretty like mine, you'll use the lighter to slightly singe the edges of the fabric circles.  Do this carefully; watch your nail polish; and your hair.


Next, dab a little hot glue on each petal and stack them together to form your flower.  The pretty pink pearlies are my "pretty" for the middle!

Because this was never going anywhere near little lovebug babies, I just hot glued the pearls into the middle of the flower.  If I were actually going to put this on a baby (which is absolutely presh presh!), I would sew the little pearlies on with some serious thread and make sure they weren't goin' anywhere!  But since this one is for grown-up me, glue it is.

Now, for the attachments...

Glue your felt circle to the back side of the flower.  And then...

Glue your pin to the TOP of the felt circle.  This is very important to always glue it to the top.  If you don't, the flower will "droop" when you wear it.   On this one, I also added a little alligator clippie just in case I decided I wasn't really too old for this...

Well, okay, I wouldn't take it that far.  But how cute are these little flowers?! Make them as big or as small as you want to.  My next project will be making them into paci clips!